Thursday, 3 November 2016

Chocolate Fudge Mini Bonfire Cupcakes

Bonfire night is soon going to be upon as, and to celebrate the evening of fireworks, sparklers and toasted marshmallows i thought i would share with you a quick, fun and easy way to make mini bonfire cupcakes. These are perfect if you are throwing a little firework party at your own place, or even a good treat with a cuppa for when your return from seeing a display. So lets quit the rambling and get onto the recipe. 


Ingredients you will need:
120g self raising flour
120g caster sugar 
120g Butter 
2 medium sized eggs 
A splash of Vanilla extract

For the icing:
1 tub of Betty Crockers Chocolate fudge icing
45g butter 
90g icing sugar 
Orange food colouring
6 Flakes
Gold sprinkles (optional)

1. First preheat the oven to 180 Degrees. Take the first three ingredients and mix together in a bowl until you have want looks like a crumby texture. Then take the two eggs and slowly add to the mixture being careful not to curdle the mixture. 

2. When all thoroughly mixed add a splash of vanilla extract for some flavour. Once this is evenly spread into the mixture, carefully spoon the mixture in to the cupcake tin as evenly as possible.

3. Pop into the oven for around 20 minutes until golden brown. Remove from the oven and leave to cool on a cooling rack.

4. For the orange fire icing, take both the butter and the icing sugar and mix together until you get a creamy texture, add both a little bit of vanilla extract and some orange Food colouring until you are happy with the shade of orange. 

5. Once the cakes have cooled, take your Chocolate fudge icing and carefully spread onto the top of each cupcake, creating a base for your Flakes (wood). Take the flakes and cut them evenly into four pieces. You will need around three pieces of flake for each bonfire. Balance them onto each other and stick them into the fudge icing to create a mini bonfire effect. Repeat this for each cupcake.

6. You can then take your orange icing and create flames by using a star shaped nozzle and piping bag. Sporadically squeeze small amounts of icing around the flakes to create little flames, and again repeat to each cupcake. Then to finish Sprinkle some gold sprinkles on top. 
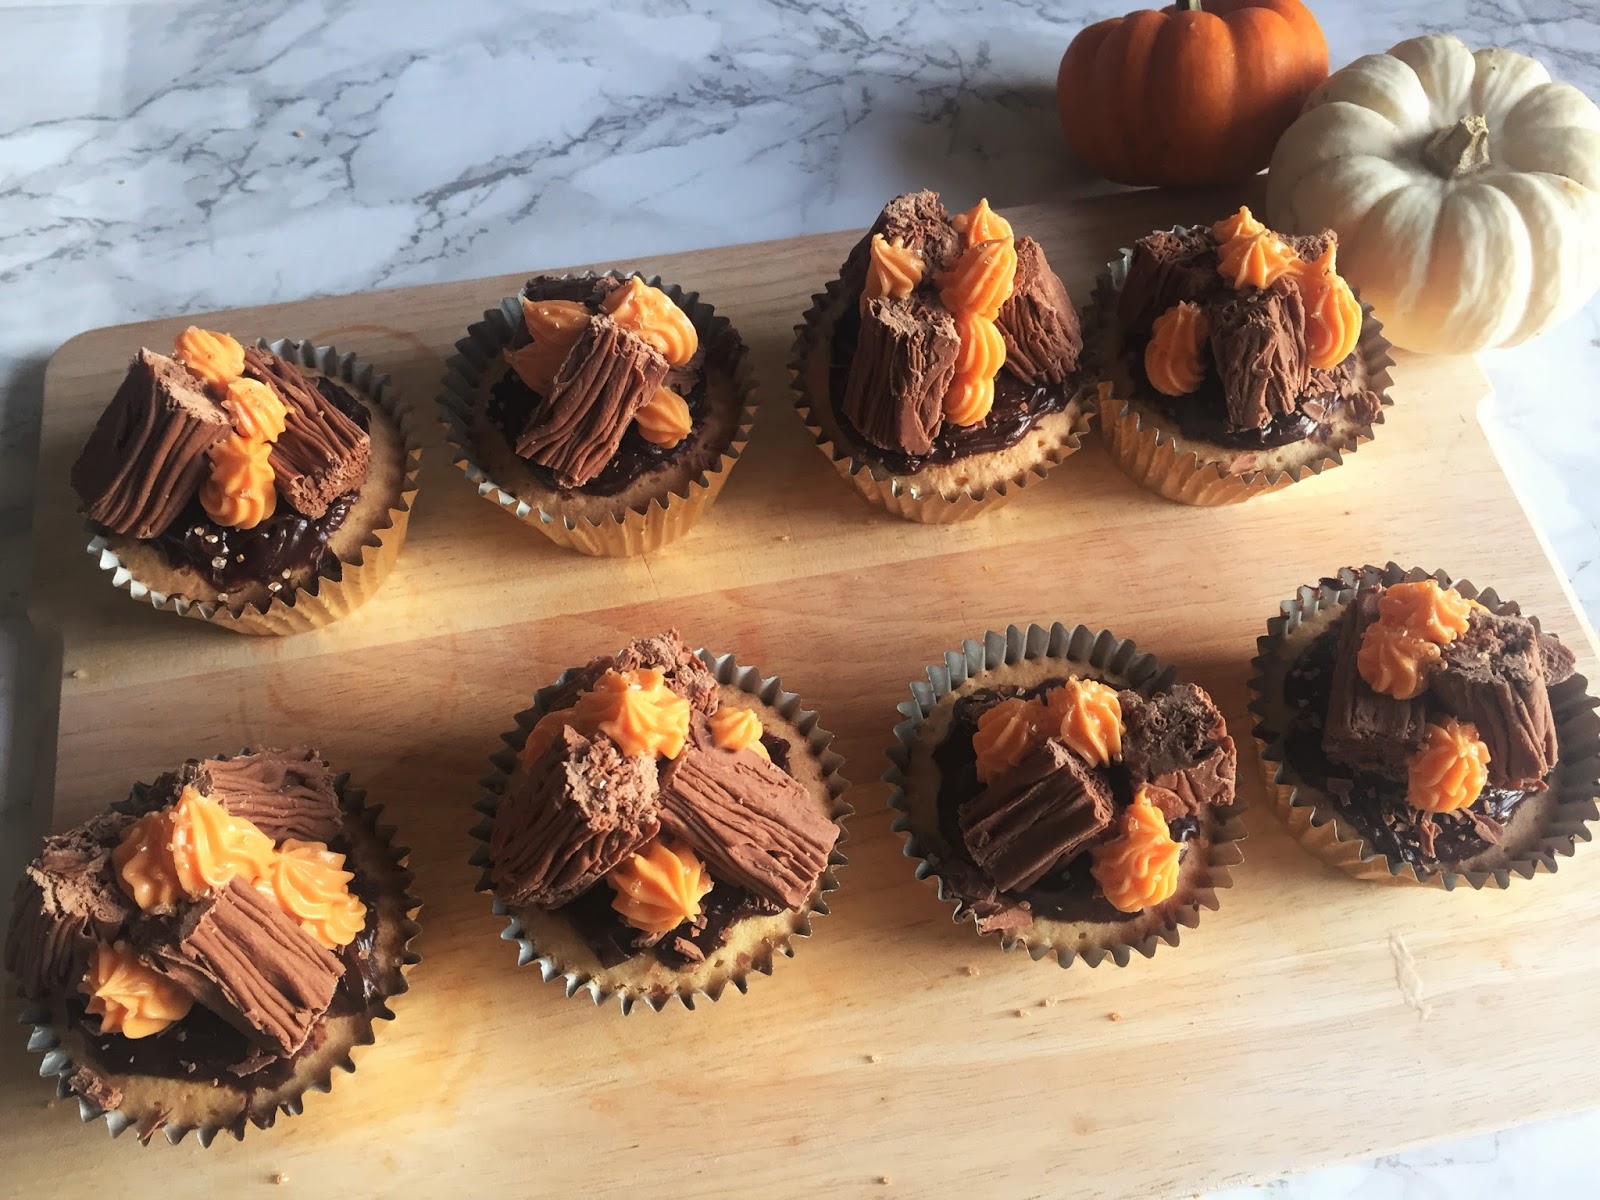


And there you have it, little bonfire cupcakes, super quick and easy but really cute at the same time. Oh and not to mention yummy too! Hope you enjoyed this little food post from me and your all having a great week. I am hopefully going to see some fireworks this weekend, wrap up in my jumpers and scarves for a cozy night outside. Whatever your up to this bonfire night, make sure its a great one! 

Thanks for reading my lovelies x 
SHARE:

Friday, 16 September 2016

Autumnal Acorn Biscuits

Now i know what your thinking...its not autumnal enough to be making acorn biscuits, the sun is still shining strong and don't even get me started on the heat. However i disagree, you can never be too autumnal and at the ready for the upcoming months and these are the perfect way to ease you in gently. These little biscuits are so super simple to make and good fun too. Myself and my friend Emily (her blog is here) decided it was time to once again get our baking heads on and create some autumnal treats. With the old favourite the bake off currently flooding our TV screens every Wednesday, i feel even more creative then usual. Who else sits there and once its finished gets that itch to bake!? So lets get into the recipe. 


Ingredients you will need :
150g Plain flour (extra for dusting)
50g Caster sugar
100g softened butter
A few drops of vanilla essence
1 Egg

For decoration:
Milk Chocolate
White Chocolate
chocolate sprinkles

Equipment you will Need
Acorn cookie cutter (link here)
Rolling pin


Recipe:
1. Preheat oven to 180 degrees, and line a baking tray with grease proof paper.
2. Take the caster sugar and flour and mix together, then add the butter and use your hands to mix it in and form a crumbly mixture. 
3. Lightly beat the egg in a bowl and a few drops of Vanilla essence, then add slowly to your mixture folding it in with a wooden spoon.
4. Once the egg is mixed in you will see a soft dough form, take this and place it on a surface dusted in flour. 
5. Cover your rolling pin in a dusting of flour also and roll out your dough until it is approximately 1 inch think. Take your cookie cutter and gently cut out your acorn shaped biscuits, laying them into the baking tray. You should be able to get about 10 biscuits out of the dough. 
6. Pop in the oven for 10 mins until a little golden and then remove from the oven and leave to cool. 


For the icing:

1. Take your milk chocolate and melt it in a bowl above a hot pan of water on the hob. Take a piping bag and fill it with chocolate, cutting a very small nozzle at the end. 
2. Pipe the chocolate over the entire surface of the biscuit as evenly as possible. Use a spoon to even out and spread if needs be. Repeat this process to all biscuits.
4. Take your chocolate sprinkles and tap on to the top of the acorn wear the little acorn hat would be. Shake off any excess when dry. 
5. For added character, take some melted chocolate, and add a small line to your acorn, to create the image of a re flexion. 


There you have it, cute and yummy acorn shaped biscuits, that any squirrel would be proud of. While engrossed in the baking madness of today, Emily and i also created some cinnamon apple shaped cupcakes. Head over to her blog for the recipe and some more autumnal baking inspiration. Link here. 

Hope you enjoyed reading today's post and have a go at making some yourself.
Thanks for reading my lovelies x


SHARE:

Sunday, 4 September 2016

Brunch @ Home

I am a big fan of brunch and breakfast, especially on a day off. I feel like its one of those meals we can forget about on a day to day basis, when we are rushing out the door with a piece of toast or banana in our hand. I know i for one am one of these people, which is why when i find i have the morning to myself and i'm not rushing to be somewhere, its nice to have fun with it. Now obviously the first thing that pops into my mind is lets go out for brunch, however i have found recently you can have just as nice food and just as much fun at home. Grab your kids or partner and drag them into the kitchen to create your perfect brunch options. Another perk of doing it at home, if you find like me your rota isn't so in sync with everyone else, brunch for one is so much better this way. The comfort of your own sofa and the company of the TV, is the perfect mix. Any way enough rambling you say and get to the food, well read on and ill show you a couple of my favourites.


Pancakes - Of course i couldn't talk about brunch and not mention at least one type of pancakes. Now normally i'm always a crepe style Pancake kind of girl. They are so super quick and easy to make, and it is near enough impossible to get them wrong. However recently i have tried to make the American style pancakes, slightly thicker and more dense. They take a little bit longer but boy they are worth it. Pair them with some mixed berries and a drizzle of syrup and you have a winner.

Ingredients

3 large eggs
115g plain flour
1 teaspoon of baking powder
140ml milk
pinch of salt 
Butter for cooking
(to decorate)
Mixed berries
Golden syrup
Sprinkle of icing sugar

Recipe 

1. To start with separate your eggs. Yolk in one bowl and white in another. Take the yolks and add the flour, baking powder and milk to the mixture. Fold it all in together until it forms a thick batter.
2. Then take the egg whites, place a pinch of salt in there and mix together until soft peaks form. Fold the egg whites into the batter until it is all thoroughly mixed in. 
3. Heat your hob to a medium temperature and place a non stick frying pan on it to preheat. Pop a knob of butter in to the pan and wait until melted. Then take a teaspoon or two of batter and place into the middle of the pan. 
 4. Fry until air bubbles in the pancake show, then flip and cook the same on the other side. Repeat this process until all the mixture has been used. 
5. For toppings take a handful of mixed berries, sprinkle them on top and a little bit of icing sugar too. Take your syrup and add as much as you like to make them super sweet and yummy.


Avocado bagel - Now this next one is so simple it doesn't even need a recipe. For any of you that love avocado, this is perfect. Instead of toast i like to take a bagel, and pop it in the toaster. While this is cooking, i take my Avocado and once taken from its shell mash it in a bowl with a pinch of salt, pepper and a squeeze of lemon. 
Once the Bagel is toasted and warm, with a tiny bit of butter, take the avocado and spread evenly. It might look like a mess but it sure doesn't taste like one. If you know you have to be somewhere but still want to enjoy your breakfast, this is the one for you. 


Smoothies - Last but not least, is the option for a breakfast smoothie. These work just as well when your on the go as you can easily take this with you, when in a rush. I however like to have my Smoothie in a cute little jar, with a striped straw just for fun. Now with Smoothies obviously any flavour or ingredients can be mixed together of your choice. This option is purely just one i have been enjoying recently. 

You will need:
1 banana 
Handful of blueberries
Handful of strawberries 
Handful of Raspberries
200ml Coconut water 
Little bit of ice


After chopping into pieces where necessary, take all of the ingredients and place into the mixer. Mix until smooth and pour into your chosen cup. Literally how simple, easy and quick. I promise you, you wont be disappointed, and whats even better is how super healthy these are. If you struggle to eat enough fruit or veg in the day this is a perfect way to sneak 1 or 2 of your five a day into your diet. 


So there you have it. Brunch @ home. These are just a couple of ideas to get you started but i am always trying new ones, so i'm sure brunch @ home 2.0 wont be far away. Hope you enjoyed reading and if you try any of these please do let me know. Whats your favourite brunch?

Thanks for reading my lovelies x


SHARE:

Wednesday, 17 August 2016

Kinder Bueno Cupcakes

So it was that time again, where i was craving cake and decided i needed to get my but in to the kitchen and cook up a storm. This time i had lots of help with my great friend Emily Ferris, (link to her blog is here! check it out for everything travel and food related.) So this time i thought to myself what could be better then your favourite chocolate bar in a cupcake option?!? Nothing i know right. 
So follow these simple steps to make some super yummy Kinder Bueno Cupcakes, and enjoy. 

Ingredients
Batter

100g butter
125g caster sugar
125g self-raising flour
2 large eggs
3 tablespoons milk
 A splash of vanilla extract
4 small bars of kinder chocolate, melted 

Icing
100g butter
200g icing sugar
1 tablespoon Nutella
A tablespoon of milk
3 Kinder bueno bars, for decoration
Splash of vanilla extract


1. First preheat your oven to 160 degrees (fan)

2. Next take the flour, caster sugar and butter and place them into a mixing bowl. Then mix all three ingredients together with an electric whisk or mixer. Do this until the ingredients looked thoroughly mixed. 

3. Then take both eggs and the milk and mix them together in a measuring jug. While the mixer is still spinning add this to the mixture slowly bit by bit, making sure it doesn't curdle. Once this is all added, take a splash of vanilla extract and mix that in too. 

4. Take the kinder chocolate and place it in a bowl on top of a saucepan of boiling water. Stir it till it is all melted and then mix the melted chocolate into the cake mixture slowly till you have a ripple marble effect.

5. Spoon the mixture evenly into a cake or muffin tray until you have used up all the mixture.


6. Place your cakes into the oven and leave for 20 minutes until golden brown

7. Once cooked take out of the oven and place onto a cooling tray, ready for the icing. 

8. Now for the icing, first mix the icing sugar and butter with an electric mixer. Add a teaspoon of milk and a splash of vanilla extract as your mixing it. 

9. When the mixture is a smooth consistency add a tablespoon of Nutella and again mix slowly till you get a slight marbled effect.

10. Spoon the icing into a piping bag and distribute the icing evenly among the cakes.

11. Now just for effect and extra yummyness, we added white chocolate stars and a piece of kinder bueno to each cupcake, just to finish it off.


There you have it, kinder bueno cupcakes, easy and so yummy. I hope you enjoyed this recipe and give it a go yourself. To see any more pictures of sweet treats or fashion or beauty pictures please go and follow my Instagram page @amyrowleyy

Thanks for reading my lovelies x 

SHARE:

Sunday, 10 July 2016

Magic Marshmallow cupcakes

Today i thought i would share with you a little cupcake recipe that i tried recently and they turned out to be really scrummy. Not only were they delicious but they looked pretty too. Perfect for a summer party or barbecue you may have coming up. They were really easy and simple to make and no the title may state magic marshmallow but there is nothing funny going on, just a yummy twist to make them even more addictive. So lets get on to the gooey details!

Ingredients you will need:
For the cake - 
125g Self Raising flour 
125g Caster sugar 
2 Large Eggs
125g Butter
1 Tablespoon of milk
A Splash of Vanilla extract
1 Tub of Fluff
 ( For those of you that are not familiar with Fluff it is a soft gooey marshmallow paste that is made by the gods and is undeniably incredible *chuckles*)

For the Icing and decoration-
1 bag of mini white and pink marshmallows
A handfull of Silver balls
120g butter 
60g Icing sugar 
A splash of vanilla extract 


* Finished Result *


* The ingredients *

1. First take the flour, caster sugar and butter and place them into a mixing bowl. Then mix all three ingredients together with an electric whisk or mixer. Do this until the ingredients looked thoroughly mixed. 
2. Then take both eggs and the milk and mix them together in a measuring jug. While the mixer is still spinning add this to the mixture slowly bit by bit, making sure it doesn't curdle. Once this is all added, take a splash of vanilla extract and mix that in too. 
3. Take a cupcake tray ready with cupcake cases, and spoon equal amounts into each case, until all the mixture is used. 
4. Place the cake tray in a preheated oven at 190C, Gas mark 5, for 20 minutes until they are a light golden colour. 
5. Now the fun part! Take the cupcakes and carefully remove them from the tray one by one. Take a knife and cut a small hole in the top of the cupcake. The hole should be about 3/4 of the way down the cupcake, but not reach the bottom. 
6. Tale the fluff and place it into a piping bag. Slowly pipe the fluff into the whole you have just made until it reaches the top of the cupcake, they should look something like this;


7. Put your cakes to one side, and take the butter and the icing sugar to create the butter icing. Place both in a mixer and mix until smooth. Add the vanilla extract and mix for a further couple of minutes. 
8. Take the mixture and using a blunt knife smooth on to the top of the cupcake. covering the hole in the cupcake and creating a base for the final steps. 
9. Once all the cupcakes are iced. Take the mini marshmallows and some scissors and carefully cut them diagonally in half. This will then create mini petals for your flower marshamallows. Do this until you feel you have enough for all your cupcakes, you can always come back to this step if you run out, (even if it is from eating them as you go.)
10, Take the marshmallow petals and place them next to each other in circles from the outside of the cupcake inwards. Finish off with a couple of silver balls in the middle for the final touch and voila! Your cupcakes are complete. 


So 10 Simple steps to making these beauty's! They are super simple and fun to make and i think the finished result looks a lot more professional then what it really is.  I hope you enjoyed reading this post and if you fancy having a go at making them yourself then please let me know how they turn out.
Hope you all have a lovely Sunday! 
Thanks for reading my lovelies x 

SHARE:

Friday, 1 July 2016

June favourites

Let's start off by saying June has been a great month for me. Super jam packed and that's just how I like it. I've decided to do a monthly post broken down into categories talking all about my favourites in the previous month. This way i can look back on memories or at things I have forgotten that I loved and you can always take a look and take inspiration or spark your memory too. The categories are going to be; Style, beauty, food and experiences. So let's get started. 

Style- without a doubt one of my key pieces and favourite items in my wardrobe this month has definitely been the pleated Riverisland dress. It's a beautiful dusky rose colour, midi length, pleated detail and a waistband to pull it in. I wore it on holiday and I absolutely fell in love. It's perfect for day or night and I have a style post on this coming up so keep your eyes peeled for that. 


* Dress - Riverisland *

Next up are my Vince Camuto sandals. They go with absolutely everything and are so incredibly comfy. I have worn them to work several times now and had so many compliments too. This particular pair remind me so much of the Isabel Marant sandals but at a fraction of the price. I bought mine from Kurt Geiger in the sale and I believe they are still online so I will link them below for you. 


* Sandals - Kurt Geiger *

Beauty- next up is my beauty favourites and I think it's important I give a shoutout to my new hair. I am absolutely loving my new balayage and shorter length and the girls at Regis Colchester did such a great job. I can't wait to go back again and maybe go even lighter next time. 
My next beauty favourite has to be my new Mac lipstick, creme in your coffee. It's the perfect shade and formula and I love wearing it on a daily basis. I'm so happy I purchased it. If you want to read more on some of my favourite Mac lipsticks click on this link to read a blogpost all about them.


Food - I don't know about you but I have a really addictive personality when it comes to food. I go through stages of being obsessed with things and having them on a daily basis, then I normally over do it and after a while go on to something else. I hope I don't sound like a crazy person and I am not the only one *laughs*. 
This month I have absolutely been loving rhubarb yoghurt with mixed berries. It is absolutely delicious. I normally get the activia rhubarb yogurt and mix it with raspberries and blueberries. Perfect for mornings at work or after dinner for a slightly healthier desert option.

My obsession for maltesers this month has hit an all time high. They sell them at work and I have to stop myself buying a packet daily. I don't know anyone apart from my boyfriend that dislikes them, but that pleases me even more as it means I don't have to share. Even better the new maltesers advert is hilarious if you haven't seen it check it out.


Experiences- last but not least is the experience section to this post. Now this can be anything from a day out or a trip or even something like a new hobby or a class I'm doing. 
This month I have three favourites in this category. The first being my holiday to Portugal, it was lovely to get away and to see some different surroundings and sun for a couple of days, I will link my two blog posts with lots more detail and pictures below, if you want to have a little nosey. 

* Holiday blog posts - Part 1 - Part 2 *

My second was a day out to Alton waters with a good friend. It was a pretty random day, super sunny and warm which is rare for us in England. We went to a place near Dedham called Alton waters it consists of miles and miles of land and forest and a huge lake with the options of all the water activities you can think of. We decided to hire bikes and we went on a 7 mile bike ride round the entire thing. It was so much fun and we had so many laughs while doing it. Plus it was great exercise too, working off all that munching on maltesers. We finished the day off with a pub roast at a local pub in Flatford Mill a village near by. It was by far one of my favourite days not only in this month but this year too. 


* Alton waters *

Last but not least and I am clapping to those of you that have made it this far down, but starting my blog was definitely one of my favourites. It's sparked my passions for fashion and beauty. It's given me a new hobby and something to do and be proud of. Plus it's great for my friends and relatives to keep up with what's going on with me and my life when I don't get to see them that much any more. For any of you wanting to do it and not sure, please just go for it. I have stopped and started and wanted to do it for years, and I'm so glad that I've finally taken the plunge. 


Hope you enjoyed this new post and I would love to know your favourites of the month so if you have any please comment below. Tune in on Sunday for a new style post if you would like to see that!

Thanks for reading my lovelies x 


SHARE:

Sunday, 19 June 2016

Our Favourite Family Dessert

This weekend me and my boyfriend went home to see my mum and family, before we go on holiday. We originally planned on having a barbecue but the typical English weather did not allow that, so we went for a nice spaghetti bolognese instead. Proper home comfort food. My mum also decided that we should have one of our absolute favourite deserts which i was more then happy to help her make. This desert is a firm favourite with all our family and friends, and whats better is it is the easiest thing to prepare and pop in the oven too. The dessert in question, is waffleberry pie. Its super scrummy and super quick. I believe its a pampered chef recipe from years ago, and over the years we have passed it on  to everyone i know so i thought why not give it some love and share it on here too.

The ingredients you will need are:
- Can of custard x 2
- punnet of raspberries 150g
- white chocolate chips 100g  
- 2 Packets of Mcvitites sweet waffles


First take a large dish to put your ingredients into, and start by cutting the waffles into quarters. Continue to do this with all the waffles, and once they are all done place them into the dish making sure you cover the base of the dish.


Next take the raspberries and simply scatter them over the waffles, spreading them out as evenly as possible. Then do the same with the white chocolate chips until all the ingredients are in the dish. A sneaky snack on the chocolate chips along the way is of course allowed (when mum isn't looking) *laughs*.


Now to finish the process off, take both cans of custard and cover the waffle and rasperry goodness, in custard, once again making sure you cover it as evenly as posssible. 


Once all the ingredients are in the dish and your pie is looking something like the picture above, its time to cook! Place the dish in the centre of the oven for around 20 minutes, at 180 degrees. 
We may have been chatting away, and kept it in the oven for a little bit longer, but no worries the crispier the waffle, the better.


VOILA! Your Waffleberry pie is complete. How super easy is that!? And i promise you, you will not be disappointed. 
Let me know if you give it a try, i would love to know how yours turned out! 
Thanks for reading my lovelies x


SHARE:
© Amy Rowley. All rights reserved.
Blogger templates by pipdig